

Introduction
Authentic Swiss Gipfeli Recipe: A Buttery Delight
Gipfeli, the Swiss take on the classic croissant, is a breakfast staple known for its delicate layers and slightly less buttery texture. Unlike its French counterpart, Gipfeli has a more bread-like consistency while still offering a crispy golden crust and a soft, airy interior. Whether enjoyed plain, with butter and jam, or as a savory treat, this Swiss delight is a must-try for pastry lovers.
In this article, we’ll guide you through a step-by-step recipe for homemade Gipfeli, covering everything from the essential ingredients to the intricate folding technique that gives it its signature texture. We’ll also explore the key differences between Gipfeli and croissants, provide expert baking tips, and answer common questions about making perfect pastries at home.
Part 1: Understanding Gipfeli and Its Origins
What is Gipfeli?
Gipfeli is a traditional Swiss pastry similar to a croissant but with key differences in texture and flavor. It has a crisp outer layer with a soft, slightly denser interior. Unlike French croissants, Gipfeli contains less butter, making it a lighter breakfast option.
The History of Gipfeli
The origins of Gipfeli trace back to Switzerland, where it became a staple in bakeries and households. Inspired by Austrian and French pastries, Swiss bakers created their own version with a unique dough composition and baking technique. Over time, Gipfeli gained popularity as a go-to breakfast item across Switzerland, often served with coffee or hot chocolate.
Key Differences Between Gipfeli and Croissants
Many people confuse Gipfeli with croissants, but there are notable distinctions:
| Feature | Gipfeli | Croissant |
|---|---|---|
| Butter Content | Less butter, slightly drier | High butter content, very flaky |
| Texture | More bread-like, slightly chewy | Light, airy, and layered |
| Taste | Subtly sweet and yeasty | Buttery and rich |
| Origin | Switzerland | France |
| Shape | Often slightly tighter rolls | Looser, flaky layers |
Part 2: Ingredients and Tools for Making Gipfeli
Essential Ingredients
To achieve the perfect Swiss Gipfeli, you’ll need a combination of high-quality ingredients. Each component plays a crucial role in ensuring the right texture and flavor.
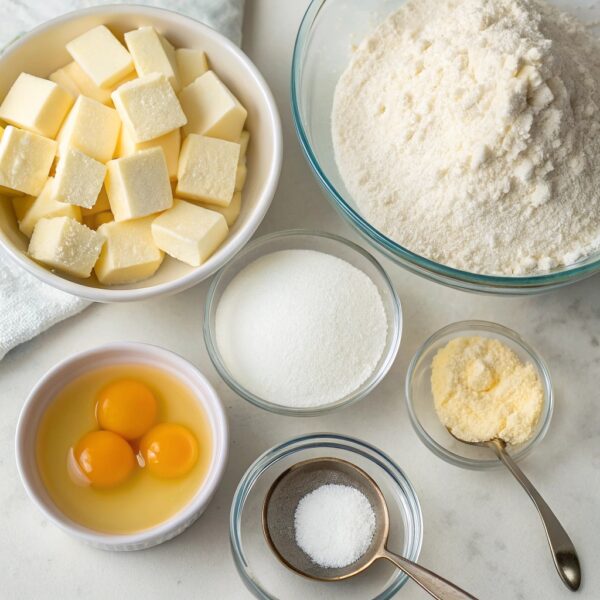
For the Dough:
- 500g all-purpose flour – Provides structure and elasticity.
- 10g salt – Enhances flavor and strengthens the dough.
- 50g granulated sugar – Adds a slight sweetness.
- 1 packet (7g) instant dry yeast – Helps the dough rise.
- 250ml lukewarm milk – Creates a soft, pliable dough.
- 50g unsalted butter, softened – Adds richness.
- 1 egg – Improves texture and helps with browning.
For the Butter Layer:
- 250g cold unsalted butter – Essential for flaky layers.
Brushing:
- 1 egg yolk – Gives the Gipfeli a golden color.
- 1 tbsp milk – Helps thin the egg wash for even application.
Tools You’ll Need
To make Gipfeli at home, having the right tools will make the process easier and ensure professional results.
- Mixing bowls – For combining ingredients.
- Rolling pin – Essential for laminating the dough.
- Pastry scraper – Helps handle and fold the dough.
- Baking sheet – For baking the Gipfeli evenly.
- Parchment paper – Prevents sticking and makes cleanup easier.
- Sharp knife or pizza cutter – To cut the dough into triangles.
- Pastry brush – For applying the egg wash before baking.
Why Quality Ingredients Matter
Using high-quality butter and flour will greatly impact the final texture of your Gipfeli. European-style butter, which has a higher fat content, is ideal for achieving flakier layers. Additionally, fresh yeast ensures proper dough fermentation, resulting in a light and airy texture.
Part 3: Preparing the Dough for Gipfeli
Step1: Mixing the Dough

- Combine the dry ingredients – In a large mixing bowl, whisk together the flour, salt, sugar, and yeast. If using active dry yeast instead of instant yeast, dissolve it in lukewarm milk for a few minutes before adding it to the flour.
- Add the wet ingredients – Pour in the lukewarm milk, followed by the softened butter and the egg. Mix until a sticky dough forms.
- Knead the dough – Transfer the dough to a lightly floured surface and knead for about 8–10 minutes. The dough should become smooth, elastic, and slightly tacky but not overly sticky. If it feels too dry, add a teaspoon of milk; if it’s too wet, sprinkle a little flour.
2: First Dough Rest
- Shape the dough into a ball and place it in a lightly greased bowl. Cover with a clean kitchen towel or plastic wrap.
- Let the dough rise in a warm place for 1–2 hours, or until it doubles in size. The ideal room temperature for rising is around 24–26°C (75–79°F).
3: Preparing the Butter Block
- Place the butter between two sheets of parchment paper and roll it into a 20×20 cm (8×8 inch) square. Keep it even and smooth.
- Chill the butter in the refrigerator while the dough continues to rise. This will help keep it firm for the lamination process.
Why This Step is Important
- Kneading the dough properly develops gluten, which gives the Gipfeli its chewy and airy texture.
- The first rise allows the yeast to ferment and create air pockets, making the pastry lighter.
- Keeping the butter block cold prevents it from melting into the dough, ensuring flakiness in the final product.
Part 4: Laminating the Dough for Flaky Layers
Lamination is the key step in creating the light, flaky texture of Gipfeli. This process involves folding butter into the dough and rolling it out multiple times to form thin, buttery layers.
1: Rolling Out the Dough
- Prepare your work surface – Lightly flour a clean countertop or rolling mat.
- Roll the dough – Take the risen dough and roll it into a rectangle, about 40×20 cm (16×8 inches).
- Place the butter block – Position the chilled butter square in the center of the dough.
2: Enclosing the Butter
- Fold the dough over the butter – Bring the left and right edges of the dough over the butter, sealing it completely like an envelope.
- Seal the edges – Gently press the seams together to prevent butter from leaking during rolling.
- Chill the dough – Wrap it in plastic wrap and refrigerate for 30 minutes to firm up the butter.
3: Rolling and Folding (Lamination Process)
To create the signature flaky layers, you’ll repeat a process of rolling and folding the dough multiple times.
- First fold:
- Roll the dough into a long rectangle (about 50×20 cm / 20×8 inches).
- Fold the dough into thirds, like folding a letter.
- Wrap it in plastic wrap and chill for 30 minutes.
- Second fold:
- Rotate the dough 90 degrees and roll it out again.
- Fold it into thirds once more.
- Wrap and chill for another 30 minutes.
- Third fold:
- Repeat the rolling and folding one last time.
- Chill for at least 1 hour before shaping the Gipfeli.
Why Laminating the Dough is Crucial
- Creates multiple thin layers of dough and butter.
- Ensures flakiness by keeping the butter intact within the dough.
- Prevents butter from melting too early, which could ruin the structure.
Part 5: Shaping the Gipfeli
Once the dough has been properly laminated and chilled, it’s time to shape the Gipfeli. This step determines the final appearance and texture of your pastries.
Step 1: Rolling Out the Dough
- Prepare your surface – Lightly flour your countertop to prevent sticking.
- Roll the dough – Take the chilled dough and roll it into a large rectangle, about 5mm (¼ inch) thick and approximately 50×30 cm (20×12 inches).
- Trim the edges – Use a sharp knife or pastry cutter to even out the edges for uniformity.
2: Cutting the Dough into Triangles
- Measure and cut – Using a ruler, mark base widths of about 8 cm (3 inches) along the bottom edge and mark the midpoints on the top edge.
- Slice into triangles – Cut from the bottom marks to the top midpoints to create even triangular pieces. Each triangle should be about 20 cm (8 inches) long.
3: Rolling the Gipfeli
- Gently stretch each triangle – Lightly pull on the pointed end to lengthen the dough slightly.
- Roll tightly from the base – Start rolling from the wide end toward the tip. Avoid pressing too hard to maintain the layers.
- Curve into a crescent shape – Place the rolled dough with the tip underneath to prevent it from unrolling while baking.
4: Second Proofing
- Arrange on a baking sheet – Line a baking tray with parchment paper and place the Gipfeli, leaving space between them for expansion.
- Cover and let rise – Allow the shaped Gipfeli to rest in a warm place for 30–45 minutes or until they become slightly puffy.
Why This Step is Important
- Even shaping ensures uniform baking.
- Stretching and rolling correctly create the perfect spiral layers.
- Proofing before baking improves the airy texture.
Part 6: Baking the Perfect Gipfeli
Now that the Gipfeli have been shaped and proofed, it’s time to bake them to golden perfection. This step requires careful attention to temperature and timing to achieve the ideal crisp and flaky texture.
Step 1: Preheating the Oven
- Set the oven temperature to 200°C (392°F). A high baking temperature helps create a crisp outer layer while keeping the inside soft and airy.
- Position the oven rack in the middle to ensure even heat distribution.
2: Preparing the Egg Wash
To give the Gipfeli a beautiful golden-brown color, apply an egg wash before baking.
- Mix the egg wash – In a small bowl, whisk together 1 egg yolk and 1 tablespoon of milk.
- Brush the Gipfeli – Use a pastry brush to lightly coat the surface of each Gipfeli, being careful not to press too hard and deflate them.
- Optional: Add toppings – For a variation, sprinkle sesame seeds, poppy seeds, or coarse sugar on top.
3: Baking the Gipfeli
- Place the baking sheet in the oven and bake for 15–18 minutes or until the Gipfeli are deep golden brown.
- Check for doneness – The Gipfeli should have a crisp exterior and feel light when lifted. If they look too pale, bake for an extra 1–2 minutes.
- Cool on a wire rack – Transfer the Gipfeli to a wire rack and let them cool for at least 10 minutes before serving.
Why This Step is Important
- A hot oven ensures the butter steams properly, creating distinct flaky layers.
- Egg wash enhances browning and adds a glossy finish.
- Cooling the Gipfeli slightly prevents them from becoming soggy.
Part 7: Serving and Storing Gipfeli
Now that your homemade Gipfeli are golden brown and beautifully crisp, it’s time to enjoy them! Here’s how to serve them for the best experience and how to store any leftovers properly.

Serving Gipfeli
Freshly baked Gipfeli taste best when served warm. Here are a few ways to enjoy them:
- Classic Swiss Breakfast – Pair your Gipfeli with butter and jam alongside a cup of coffee, tea, or hot chocolate.
- Savory Option – Serve with cheese, ham, or smoked salmon for a delicious, filling breakfast.
- Sweet Indulgence – Dust with powdered sugar or drizzle with honey for a touch of extra sweetness.
- Filled Variations – Slice open and spread with Nutella, almond paste, or fruit preserves for a more decadent treat.
How to Store Gipfeli
If you have leftovers, follow these storage tips to keep them fresh:
At Room Temperature (Short-Term Storage)
- Place the Gipfeli in an airtight container or a paper bag to maintain crispness.
- Store at room temperature for up to 2 days.
In the Refrigerator (For Longer Freshness)
- Wrap each Gipfeli in plastic wrap and store them in an airtight container.
- They will stay fresh for up to 5 days but may lose some crispness.
- Reheat in the oven at 180°C (350°F) for 5–7 minutes to restore texture.
In the Freezer (Best for Long-Term Storage)
- Wrap each Gipfeli in plastic wrap, then place them in a freezer bag.
- Store for up to 2 months.
- Reheat frozen Gipfeli directly in a preheated oven at 180°C (350°F) for 10–12 minutes.
Why Proper Storage Matters
- Avoids sogginess – Keeping Gipfeli in a paper bag or airtight container helps maintain their flaky texture.
- Preserves freshness – Freezing prevents the pastries from going stale.
- Retains flavor – Reheating in the oven ensures the best taste compared to microwaving.
Part 8: Common Mistakes and Troubleshooting
Even experienced bakers can run into issues when making Gipfeli. Here are some common mistakes and how to fix them to ensure perfect results every time.
1. Dough is Too Sticky or Too Dry
Problem: The dough is too sticky and hard to work with, or it feels too dry and cracks.
Solution:
- If the dough is too sticky, add a little flour, 1 tablespoon at a time, until it becomes soft but not sticky.
- If the dough is too dry, add 1–2 teaspoons of lukewarm milk and knead until it becomes smooth.
- Always measure ingredients accurately to avoid imbalances in flour and liquid.
2. Butter Leaks During Baking
Problem: The butter melts and seeps out, making the pastry greasy instead of flaky.
Solution:
- Keep the butter and dough cold throughout the lamination process. If the dough gets too warm, refrigerate it before continuing.
- Seal the edges properly when enclosing the butter to prevent leakage.
- Do not overwork the dough, as too much handling can cause the butter to soften.
3. Gipfeli Doesn’t Puff Up or Rise Properly
Problem: The pastry is dense and lacks flaky layers.
Solution:
- Make sure to proof the dough properly before baking. It should be slightly puffy, but not over-risen.
- Use fresh yeast for proper leavening. If your yeast is expired, the dough won’t rise well.
- Avoid rolling the dough too thin during lamination, as this can compress the layers and prevent rising.
4. Gipfeli Turns Out Too Hard or Dry
Problem: The pastry is too tough, dry, or chewy instead of light and crisp.
Solution:
- Do not overbake. If the Gipfeli are browning too quickly, lower the oven temperature slightly.
- Make sure to bake at the right temperature (200°C / 392°F) to allow proper expansion.
- Do not over-knead the dough, as this can develop too much gluten and result in a tough texture.
5. Uneven Layers or Misshapen Gipfeli
Problem: The layers don’t form properly, or the Gipfeli looks uneven after baking.
Solution:
- Roll the dough evenly during lamination and cut uniform triangles for consistent shaping.
- Roll tightly but gently when shaping the Gipfeli to maintain a smooth spiral structure.
- Always let the shaped Gipfeli rise before baking to help them keep their shape.
Why Troubleshooting is Important
- Fixing small mistakes early ensures better results in the final bake.
- Understanding the science behind the process helps you improve your baking skills.
- Avoiding common issues makes the Gipfeli taste and look more professional.
FAQs
What is the difference between a croissant and a Gipfeli?
Gipfeli has less butter than a croissant, making it slightly denser and less flaky. It also has a more yeasty flavor, while croissants are ultra-buttery and airy.
What is the secret to a good croissant?
The key to a great croissant (or Gipfeli) is proper lamination, which involves layering the butter and dough correctly to create flakiness. Using high-quality butter and allowing the dough to rest between folds also enhances the texture.
What ingredients are in a croissant?
A classic croissant includes flour, yeast, sugar, salt, butter, and milk, with a butter-rich dough laminated to create layers.
What is the recipe for Mangria?
Mangria is a strong fruit-infused sangria, made with red wine, brandy, orange juice, and fruit. Simply mix and chill before serving.
Authentic Swiss Gipfeli Recipe: A Buttery Delight